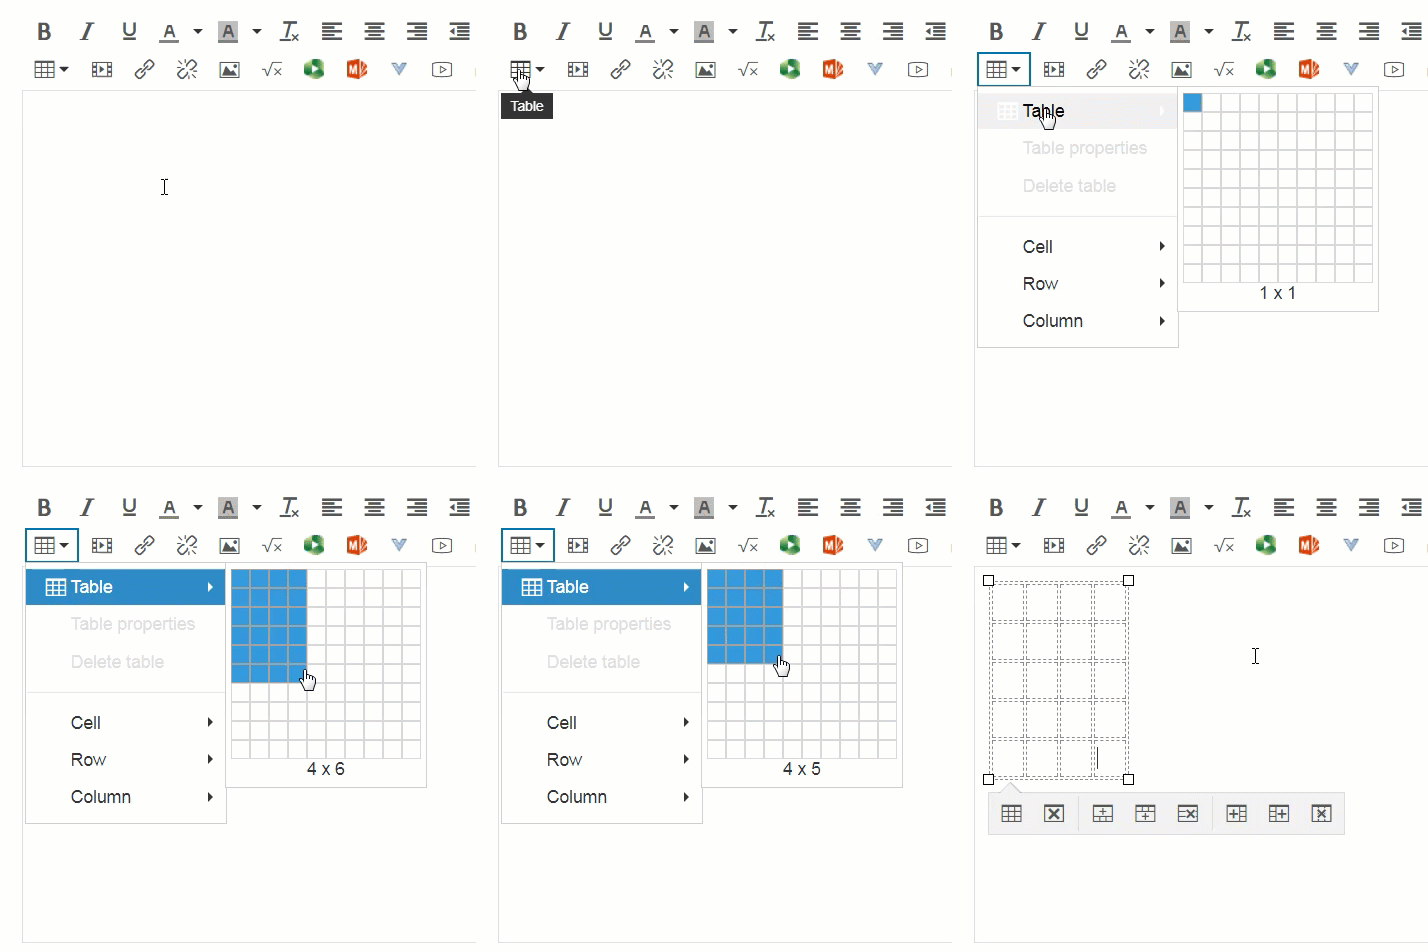
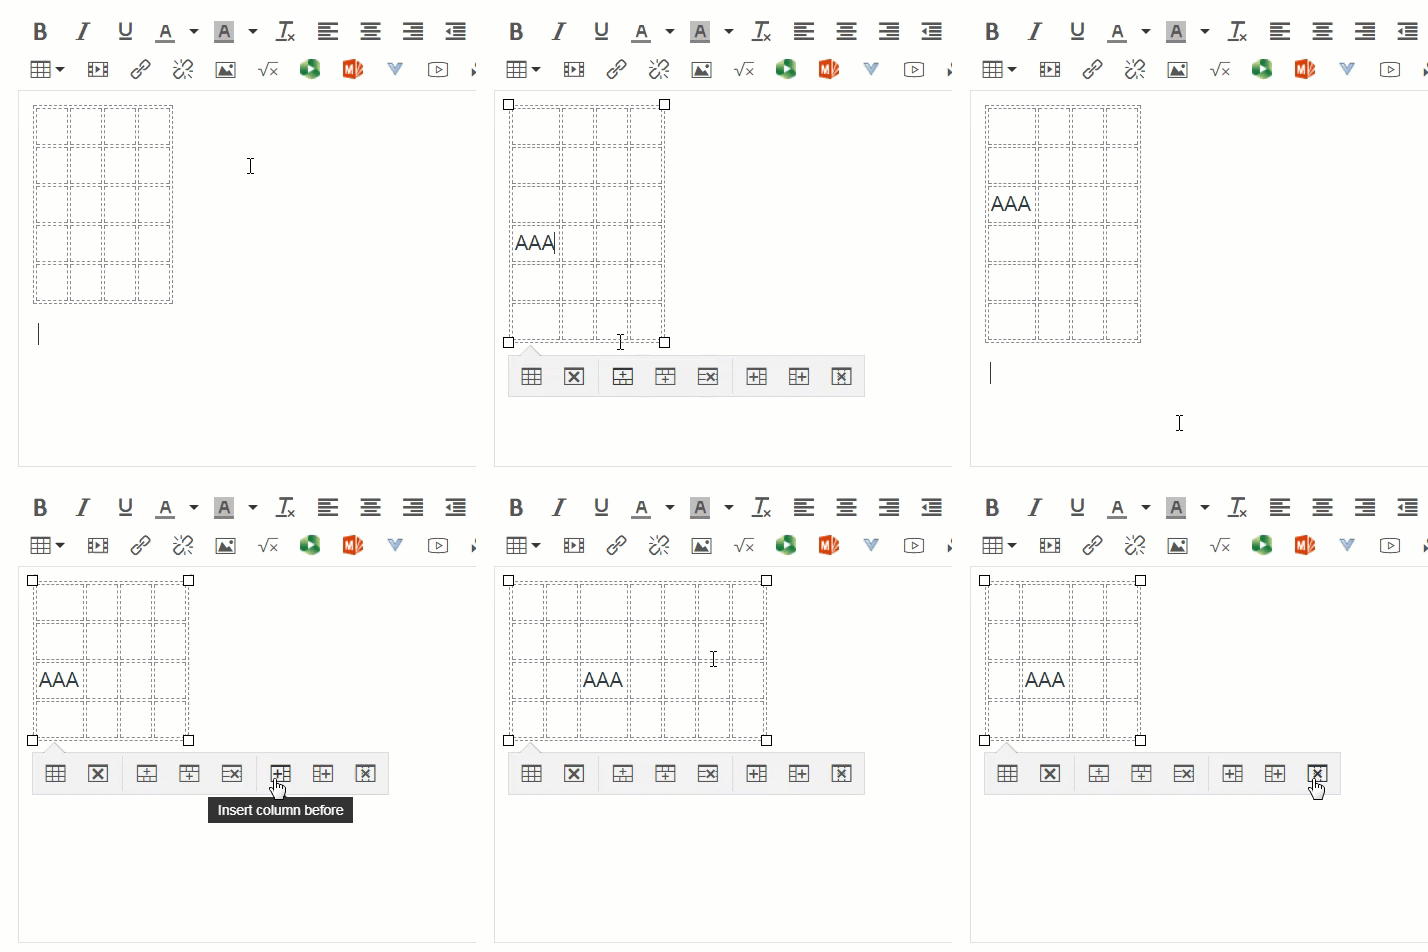
Today we are going to talk about tables. There are many ways to put a table in Canvas, and there are many creative uses for tables on our content pages. We'll begin with the very basics, which is how to insert, format, and modify a table using the Table Creator feature on the Canvas Rich Content Editor. To do this, open the Table icon and click your cursor on the grid to determine your dimensions of the table. After you have chosen your dimensions, you can still modify then on the content page.
Once your table is created, you can use the table properties option to further edit the specifications. To do this, place your mouse cursor anywhere on the table and select the Table properties option from the dropdown.
Below are the various options and general properties that you can adjust on your table. You can learn more about tables in Canvas here: https://community.canvaslms.com/docs/DOC-12912-415241504.
General Properties
- Width: The width of your table (in pixels or percent, e.g. 500px, 50%). Note that the table width may be adjusted manually by selecting the table until the adjustment handles appear around the perimeter of the table, then clicking and dragging the handles to adjust the size.
- Height: The height of your table (in pixels or percent, e.g. 500px, 50%). Note that the table height may be adjusted manually by selecting the table until the adjustment handles appear around the perimeter of the table, then clicking and dragging the handles to adjust the size.
- Cell Spacing: The space between individual cells as well as cells and table borders (in pixels, e.g. 3px).
- Cell Padding: The space between the cell border and its content (in pixels, e.g. 5px).
- Border: The thickness of your table border (in pixels, e.g. 5px).
- Caption: The table label is displayed on top of the table.
- Alignment: The location of your table on the page.
Advanced Properties
- Style: The style of your table. You can add custom CSS styling to your table such as colors, borders, spacing, and alignment.
- Border Color: The color of your table border. You can either type in the hexadecimal RGB number for the color you want (in #nnnnnn format) or type in basic colors (red, pink, cyan, blue, green, yellow, brown, black, etc.)
- Background Color: The color of your table background. You can either type in hexadecimal RGB number for the color you want (in #nnnnnn format), or type in basic colors (red, pink, cyan, blue, green, yellow, brown, black, etc.)
HTML Tables
The Rich Content Editor is a great introduction to tables, but it only provides a fundamental structure for your table. If you want to further customize unique aspects of your table, then you likely will benefit from exploring HTML. In HTML format, the code for a basic table will require defining the start and end of a table <table>, as well as the table row <tr> and the individual cells <td> (table cells are called table definitions in HTML). Below is the code for a 2x2 table. Feel free to modify the content in the individual cells and click Run Code. [tip: refresh the screen if you want to reset the table HTML content]
That code would give you a 2x2 table. If you wanted to add another row, then add the following code below the second row in the code:
<tr>
<td>row 3, cell 1</td>
<td>row 3, cell 2</td>
</tr>
If you wanted to add another column, then you would add: <td>row X, cell 3</td> to each row (of course, replace the cell content with your own content). Or in this case it would likely be easier to use the Rich Content Editor. Below are several examples of what the HTML would looke like for various table dimensions. Feel free to play with the code and modify the table dimensions through the code. Note that on the last example, the border is set to 3 pixels. Modify that value and see how it renders. How does one pixel differ from 3 pixels, and what does a width of 15 pixels look like? If you do not want any border, then either write it <table border="0"> or simply <table>.
A basic note about html is that every time you open a tag, you must close it. So every <table> needs a </table>, and every <td> needs a closing </td>. Thus you need to keep track of all your <tr></tr>'s and <td></td>'s.
Now to add a little more to the tables, it is really easy to include captions and headers. Headers are similar to putting <b>bold</b> within the cells, but is a more proper and much cleaner way to do so. You can assign any cell to be a header cell, but for continuity they are typically either vertically or horizontally aligned. Here are some examples of captions and headers:
Now suppose you want a cell that spans more than one column or more than one cell. You would define that within the cell by using the following tag: colspan="[the number of cells it should span]". A quick example below:
If you would like to include cell padding (which I almost always do), then you can include that information within the <table> tag. Cell padding is basically like putting space between the content of the cell and the border or wall of the cell. Some examples below:
One final attribute I will cover in this blog post is defining widths and heights for tables or cells. There are two different ways to define the the attributes for the width or height. You can either specify pixels or percentages.
In case you are wondering what the code for the above table looks like:
This may seem like a lot of information, but with a little dedication and practice, styling tables in HTML can be easy. Many times the Rich Content Editor is sufficient, but learning the fundamentals of HTML will give you the freedom to customize your tables. You can further empower your coding skills by researching online to find tips and advice. Some good starting points would be:
https://www.w3schools.com/html/html_tables.asp
http://divtable.com/generator/
https://www.quackit.com/html/html_table_generator.cfm
http://www.rapidtables.com/web/tools/html-table-generator.htm
Written by Dr. Sean Nufer, Director of Ed Tech for TCS Education System.


