
What is a branching scenario?

In this blog post, we will discover the basics of how to create a branching scenario in PowerPoint. Typically, PowerPoint is known for advancing a slide deck forward or backward, similar to the old carousels for the slide projectors. But in a branching scenario, what we want is the ability to navigate around - not just linearly (i.e. advancing the slide forward to the next slide or regressing back to the previous slide).
An example of an oft-used branching scenario would be an ATM menu. When you swipe your card in the ATM, you are presented with a menu of items. The next screen that displays is entirely dependent on the selection that you make on the initial screen. You can check your balance, make a withdrawal, deposit money, etc. You don’t simply hit next a number of times until you land on the screen you want. The ATM navigation is branching and not linear.
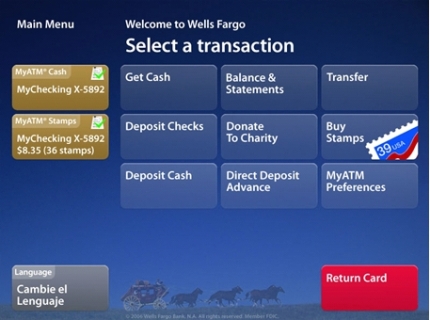
When we discuss branching scenarios, we first begin with a storyboard to chart the navigation of the user. In the above example of the ATM interface, there is likely a splash screen of sorts. This is the screen that displays as you approach the kiosk, and it usually says something such as "Welcome" and "Please swipe your card [or touch the screen] to begin". The image above is the main menu screen - a jumping off point for the user. A number of scenarios may play out next depending on the option that the user chooses.
Another example of a branching scenario might be a concierge kiosk at a hotel. This could be a self-guided kiosk that displays commonly requested inquiries. The scenarios can be mapped out in a hierarchical branching format. Here is an example of what that might look like:

Here we have a splash screen to welcome the user. It likely says "touch anywhere to begin". The user then advances to the second level, which is a main menu with options to discover information about Rooms, Amenities, or Local Attractions. If the user selects the latter then s/he will be able to read about the attractions of the area, and a back or home button will take him or her back up to the main menu. Choosing the amenities option will take the user to an overview of hotel amenities, with options to further explore the concierge desk or dining options. This hotel happens to have many dining options, so from the main dining page s/he can check out the food court page or research the more formal dining options. At this point, the restaurant page is level 5, because the user advanced as follows: splash/intro -> main menu -> amenities -> dining options -> restaurants.
On each of the pages from levels 3-5, there should be a main menu button that takes the user right back to level 2. There are likely back buttons that will take the user up one level to the previous screen. The more levels you have in a branching scenario, the more complicated the storyboarding becomes. Your content will dictate how many levels you need, and how many screens you will need on each level.
Creating your branching scenario in PowerPoint
Now let's explore how you can create an interactive branching scenario in PowerPoint. We'll assume that you already have your content prepared and mapped out into levels. To demonstrate the principles of branching in PowerPoint, I'll start with a blank presentation and put 4 slides. I will put color on slides 2-4.

Now I have a main menu, and three color slides. The next step is to create buttons for the main menu. A button can be any shape or picture. Once you place your shape, simply right click and select Link (or the hotkey is to press Ctrl + K). This will pull up a menu that will allow you to create a hyperlink for your shape (or picture). A hyperlink is an interaction that occurs when the object is clicked on. There are many hyperlink options in PowerPoint. You can have the hyperlink open a webpage, email a recipient, or in our case we want the user to be taken to a specific slide in our presentation.
For my branching scenario, I am going to create three buttons on my main menu. I will choose a rounded rectangle, but you can choose whatever shape you want (e.g. a square, circle, arrow, etc.). From the ribbon menu, click on the Insert ribbon, then click on the Shapes icon in the Illustrations group to see a dropdown menu of options. Review the video below for details on how to create and hyperlink my navigation buttons.

The last thing I will include on my kiosk is a back button on each of the colored slides. This will return them back up to the first slide. To do this, I copied (Ctrl + C) the first (red) button on the first slide and pasted it (Ctrl + V) onto the second slide. Since both the button and the slide were red, I changed the color to blue. Then I changed the hyperlink (Ctrl + K) so that it linked back to the first slide. Then I copied the button again and pasted it on the last two slides. I changed the button on the last side from blue to red, since the slide color is blue.
The last thing that I do when creating a branching scenario is to change the show type from "presented by a speaker" (default setting) to "browsed at a kiosk". This disables all keyboard and mouse functionality other than clicking on a hyperlink. Since the only hyperlinked elements are buttons, it forces my user to navigate through the branched scenario. You can change the settings to kiosk mode by clicking the ribbon: Slide Show -> Set Up Slide Show -> Show type: Browsed at a kiosk (full screen).

And now my work is done. Instead of a typical PowerPoint presentation where you advance progressively, you know have an interactive kiosk with a branching scenario. You can review the end result below:
Of course, this is a very simple demonstration of the branching process, but it shows the fundamental elements involved in storyboarding scenarios and creating unique paths for the user. All you need to do now is add your creativity. Below is a final example of what might be possible using a branching technique. Click on the icons to the left of the screen.
Written by Dr. Sean Nufer, Director of Ed Tech for TCS Education System.